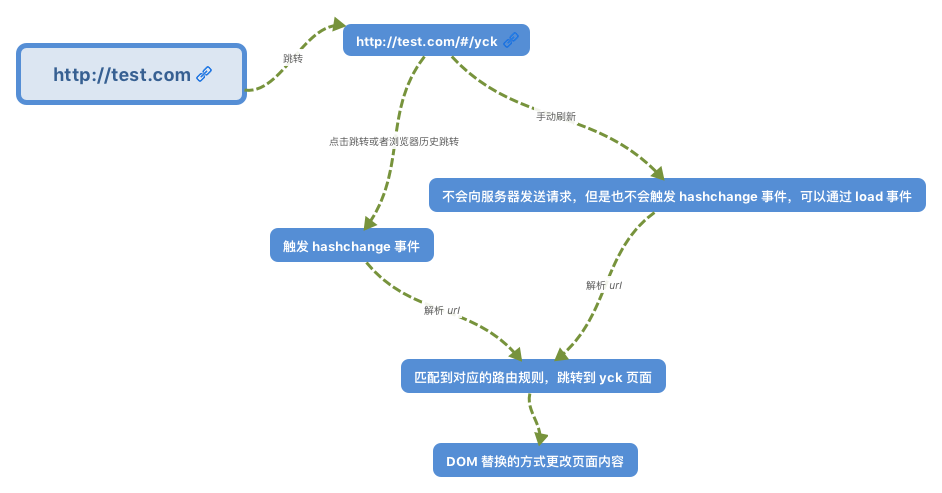
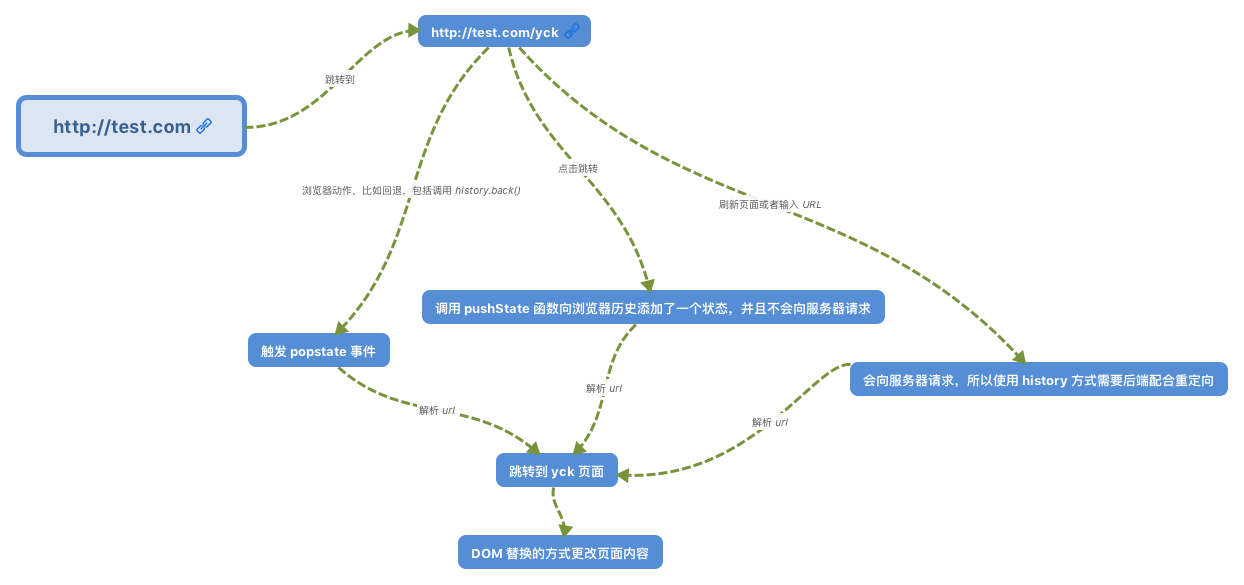
为什么需要 Virtual Dom
众所周知,操作 DOM 是很耗费性能的一件事情,既然如此,我们可以考虑通过 JS 对象来模拟 DOM 对象,毕竟操作 JS 对象比操作 DOM 省时的多。
举个例子
// 假设这里模拟一个 ul,其中包含了 5 个 li
;[1, 2, 3, 4, 5][
  // 这里替换上面的 li
  (1, 2, 5, 4)
]
从上述例子中,我们一眼就可以看出先前的 ul 中的第三个 li 被移除了,四五替换了位置。
如果以上操作对应到 DOM 中,那么就是以下代码
// 删除第三个 li
ul.childNodes[2].remove()
// 将第四个 li 和第五个交换位置
let fromNode = ul.childNodes[4]
let toNode = node.childNodes[3]
let cloneFromNode = fromNode.cloneNode(true)
let cloenToNode = toNode.cloneNode(true)
ul.replaceChild(cloneFromNode, toNode)
ul.replaceChild(cloenToNode, fromNode)
当然在实际操作中,我们还需要给每个节点一个标识,作为判断是同一个节点的依据。所以这也是 Vue 和 React 中官方推荐列表里的节点使用唯一的 key 来保证性能。
那么既然 DOM 对象可以通过 JS 对象来模拟,反之也可以通过 JS 对象来渲染出对应的 DOM
以下是一个 JS 对象模拟 DOM 对象的简单实现
export default class Element {
  /**
   * @param {String} tag 'div'
   * @param {Object} props { class: 'item' }
   * @param {Array} children [ Element1, 'text']
   * @param {String} key option
   */
  constructor(tag, props, children, key) {
    this.tag = tag
    this.props = props
    if (Array.isArray(children)) {
      this.children = children
    } else if (isString(children)) {
      this.key = children
      this.children = null
    }
    if (key) this.key = key
  }
  // 渲染
  render() {
    let root = this._createElement(
      this.tag,
      this.props,
      this.children,
      this.key
    )
    document.body.appendChild(root)
    return root
  }
  create() {
    return this._createElement(this.tag, this.props, this.children, this.key)
  }
  // 创建节点
  _createElement(tag, props, child, key) {
    // 通过 tag 创建节点
    let el = document.createElement(tag)
    // 设置节点属性
    for (const key in props) {
      if (props.hasOwnProperty(key)) {
        const value = props[key]
        el.setAttribute(key, value)
      }
    }
    if (key) {
      el.setAttribute('key', key)
    }
    // 递归添加子节点
    if (child) {
      child.forEach(element => {
        let child
        if (element instanceof Element) {
          child = this._createElement(
            element.tag,
            element.props,
            element.children,
            element.key
          )
        } else {
          child = document.createTextNode(element)
        }
        el.appendChild(child)
      })
    }
    return el
  }
}
Proxy 与 Object.defineProperty 对比
Object.defineProperty 虽然已经能够实现双向绑定了,但是他还是有缺陷的。
- 只能对属性进行数据劫持,所以需要深度遍历整个对象
- 对于数组不能监听到数据的变化
虽然 Vue 中确实能检测到数组数据的变化,但是其实是使用了 hack 的办法,并且也是有缺陷的。
const arrayProto = Array.prototype
export const arrayMethods = Object.create(arrayProto)
// hack 以下几个函数
const methodsToPatch = [
  'push',
  'pop',
  'shift',
  'unshift',
  'splice',
  'sort',
  'reverse'
]
methodsToPatch.forEach(function(method) {
  // 获得原生函数
  const original = arrayProto[method]
  def(arrayMethods, method, function mutator(...args) {
    // 调用原生函数
    const result = original.apply(this, args)
    const ob = this.__ob__
    let inserted
    switch (method) {
      case 'push':
      case 'unshift':
        inserted = args
        break
      case 'splice':
        inserted = args.slice(2)
        break
    }
    if (inserted) ob.observeArray(inserted)
    // 触发更新
    ob.dep.notify()
    return result
  })
})
反观 Proxy 就没以上的问题,原生支持监听数组变化,并且可以直接对整个对象进行拦截,所以 Vue 也将在Vue3中使用 Proxy 替换 Object.defineProperty
let onWatch = (obj, setBind, getLogger) => {
  let handler = {
    get(target, property, receiver) {
      getLogger(target, property)
      return Reflect.get(target, property, receiver)
    },
    set(target, property, value, receiver) {
      setBind(value)
      return Reflect.set(target, property, value)
    }
  }
  return new Proxy(obj, handler)
}

let obj = { a: 1 }
let value
let p = onWatch(
  obj,
  v => {
    value = v
  },
  (target, property) => {
    console.log(`Get '${property}' = ${target[property]}`)
  }
)
p.a = 2 // bind `value` to `2`
p.a // -> Get 'a' = 2
数据劫持
Vue 内部使用了 Object.defineProperty() 来实现双向绑定,通过这个函数可以监听到 set 和 get 的事件。
var data = { name: 'yck' }
observe(data)
let name = data.name // -> get value
data.name = 'yyy' // -> change value

function observe(obj) {
  // 判断类型
  if (!obj || typeof obj !== 'object') {
    return
  }
  Object.keys(obj).forEach(key => {
    defineReactive(obj, key, obj[key])
  })
}

function defineReactive(obj, key, val) {
  // 递归子属性
  observe(val)
  Object.defineProperty(obj, key, {
    enumerable: true,
    configurable: true,
    get: function reactiveGetter() {
      console.log('get value')
      return val
    },
    set: function reactiveSetter(newVal) {
      console.log('change value')
      val = newVal
    }
  })
}
以上代码简单的实现了如何监听数据的 set 和 get 的事件,但是仅仅如此是不够的,还需要在适当的时候给属性添加发布订阅
<div>{{name}}</div>
在解析如上模板代码时,遇到 {{name}} 就会给属性 name 添加发布订阅。
// 通过 Dep 解耦
class Dep {
  constructor() {
    this.subs = []
  }
  addSub(sub) {
    // sub 是 Watcher 实例
    this.subs.push(sub)
  }
  notify() {
    this.subs.forEach(sub => {
      sub.update()
    })
  }
}
// 全局属性,通过该属性配置 Watcher
Dep.target = null

function update(value) {
  document.querySelector('div').innerText = value
}

class Watcher {
  constructor(obj, key, cb) {
    // 将 Dep.target 指向自己
    // 然后触发属性的 getter 添加监听
    // 最后将 Dep.target 置空
    Dep.target = this
    this.cb = cb
    this.obj = obj
    this.key = key
    this.value = obj[key]
    Dep.target = null
  }
  update() {
    // 获得新值
    this.value = this.obj[this.key]
    // 调用 update 方法更新 Dom
    this.cb(this.value)
  }
}
var data = { name: 'yck' }
observe(data)
// 模拟解析到 `{{name}}` 触发的操作
new Watcher(data, 'name', update)
// update Dom innerText
data.name = 'yyy'
接下来,对 defineReactive 函数进行改造
function defineReactive(obj, key, val) {
  // 递归子属性
  observe(val)
  let dp = new Dep()
  Object.defineProperty(obj, key, {
    enumerable: true,
    configurable: true,
    get: function reactiveGetter() {
      console.log('get value')
      // 将 Watcher 添加到订阅
      if (Dep.target) {
        dp.addSub(Dep.target)
      }
      return val
    },
    set: function reactiveSetter(newVal) {
      console.log('change value')
      val = newVal
      // 执行 watcher 的 update 方法
      dp.notify()
    }
  })
}
以上实现了一个简易的双向绑定,核心思路就是手动触发一次属性的 getter 来实现发布订阅的添加。

